Showing posts with label Rimmel London. Show all posts

Wednesday, May 11, 2016

Shades of Grey Nail Art

Press Sample


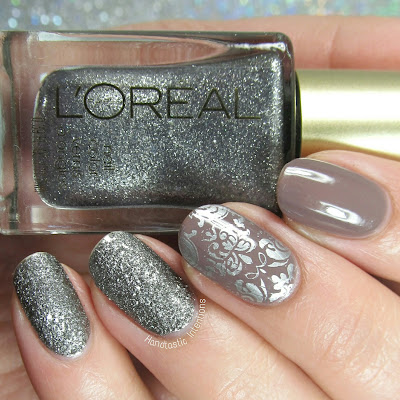
Today I have a pretty simple skittle mani. A skittle mani is one that doesn't have every finger as the same design. I have no idea where the term came from, but I'm going with it. I used all grey tones for this one. I used Rimmel Steel Grey (discontinued), L'Oreal Caution Please from the 50 Shades of Grey collection, and Pure Ice Silver Star which is always a great stamper. I believe the L'Oreal collection came out along with the movie 50 Shades of Grey and not the books.

Shades-of-Grey-Nail-Art

Friday, March 4, 2016

Side French Nail Art

Press Sample


I have a clean and simple nail art design for you today. I think we all are aware of the classic french manicure, but I wanted to switch it up a bit. It is so simple, but adds a bit of interest to a mani. I started out with a nude color and added some holographic blue. The polishes I used in this design are Rimmel London Caramel Cupcake, which is one of my favorite nudes. It dries really quick and almost creates the look of mannequin nails with my skin tone. After I painted two coats of Caramel Cupcake, I placed a french tip nail vinyl on the side of my nail and added Cirque Colors Royal Hawaiian from last year's Juicy Collection. I love that collection so much, it is so vibrant! I knew Royal Hawaiian would look great paired with a nude. 

Side-French-Manicure

Sunday, February 1, 2015

The Polished Bookworms: Nail Art Inspired by Big Little Lies by Liane Moriarty

In addition to my love of nail polish, I love reading. Many of you know this about me. I recently joined a book club which combines the two called The Polished Bookworms! The book for January was Big Little Lies by Liane Moriarty. The plot took many unexpected turns, and was definitely a drama. One of the things I really appreciated about the book was that she covered some darker issues that some people may not want to think about at all. I appreciated that most. The group will be doing nail art at the end of each month that is inspired by the book we have read. Here are mine:


Thursday, October 2, 2014

Nail Art: #31DC2014 Day 31 Honor Nails You Love

My last 31 Day Nail Art Challenge post!! I was inspired by someone I have mentioned on this blog before! The Nailasaurus is amazing, and I love her work. She does beautiful work and has a wide variety of designs. Her line work deserves much respect and I attempted to recreate one of my favorites! When I first saw this, I thought it was achieved with tape, but no, she freehand painted it! She just painted with all nail polish, but I did my lines with acrylic paint first because it is easier to control, then I went over it with Lancome Ginger Swing. The black I used was Rimmel Lasting Finish Pro in Black Satin (discontinued), but it doesn't matter what black you use. 


Wednesday, September 10, 2014

Nail Art: #31DC2014 Day 10 Gradient

Today the daily challenge theme is gradient. I love gradients and I do them all the time it seems like. I started to think about what I wanted to do for today's look. I thought of all kinds of crazy designs and things I had seen and wanted to try, but I settled on the gradient version of a french manicure. I can't remember where I first saw this design, if I do, I will link it here. I remember the first time I saw it, I thought it looked so soft and feminine. I used a nude color rather than a sheer and traditional white. The nude I used was Rimmel London 60 Seconds in Caramel Cupcake. I think this is my favorite nude at the moment! I also used Sinful Colors Snow Me White. I sponged those on and topped it with Fairy Dust and voila!


Sunday, September 7, 2014

Nail Art: #31DC2014 Day 7 Black & White

For the daily nail art challenge, today's prompt was black and white! I was really excited about this one because the colors are so simple (not really colors at all). I feel like with the absence of color  I could focus more on the design. I ended up doing a dry marble which has been somewhat difficult for me in the past. I only recently figured out that using a nail art brush is much easier than a toothpick, I don't know why that realization took me so long! The black I used is discontinued: Rimmel Lasting Finish Pro, but the 60 Second line they have now is also great. I used a Pure Ice white. You could use any black and white. I have a ton in my collection and rotate them based on what I am using them for. 


Saturday, August 9, 2014

Born Pretty Store Review: Water Decals

Press Sample


I have another Born Pretty Store review for you! I have some adorable water decals, which I was ecstatic to receive, even though the theme is more winter than summer. I loved the deer and the trees! It reminds me of those leggings that were super popular this last year. Since it isn't winter I was trying to figure out how to still use these in a summery way, and this is what I came up with. I started with a base color of Rimmel London 60 Seconds in Caramel Cupcake, then I used the purple tribal print stripes and placed them on one side of my nail. I waited for the decal to dry in place and then I added a stripe of Sally Hansen Insta-dri Pronto Purple and dots of Sally Hansen Diamond Strength Luminous Tulips.


Monday, June 16, 2014

Nail Art: Blue and White Ceramics Inspired

Today I have a fun, yet delicate design for you! I have been really inspired lately by many nail artist re-creating the look of blue and white ceramics. I really wanted to re-create those looks with stamping because I haven't had a lot of time to do freehand nail art lately. I used Sinful Colors Snow Me white as a base and stamped Rimmel London Blue Eyed Girl using MoYou Tourist Plate 07.


Wednesday, January 1, 2014

Happy New Year!

Happy New Year! I hope you all had a fun and safe night last night! We stayed in and celebrated by cooking a nice seafood dinner. Did you make any resolutions?

I quickly did my nails for the occasion! I feel like there is a lot going on between Christmas and New Year, I loose track of time. I decided on a somewhat simple design. It didn't turn out exactly as I hoped, but here is the final product:


Monday, November 18, 2013

Nail art: Black and Red Chevron Tips

If you read my last post about the Maybelline Color Show Brocades Collection, you know that I wasn't a fan of Embellished Blue. I did, however, decide to try out another shade:Crushed Crimson. This time, I wasn't disappointed. The polish is still really thick because of the dense glitter, but it was easier to work with. I really like how there is a mixture of shapes of glitter in this polish, especially the random larger hex glitter.


I used two careful layers of Crushed Crimson and then free hand painted chevron tips in two layers of Rimmel Lasting Finish PRO in Black Satin. Really simple. I did this while cooking dinner, which is something I don't recommend, but was doable. I really liked that Crushed Crimson was less textured than Embellished Blue. It is a great Christmas color, and I will definitely be using this again closer to the holidays! Hope you like it!

Wednesday, November 13, 2013

Nail Art: White Roses

Today I have my creation for #nailartnov challenge: black and white. I was actually really excited about this challenge! I really like black and white looks, because it is really about the design rather than the color. I had a hard time deciding on what to do, but I settled on something I had seen and wanted to recreate for a while. I was inspired by Centralparkkitty and Nail_Art_N3rd on instagram for their rose designs in color, so I wanted to try it in just pure white. Here is what I came up with:


I used Rimmel Lasting Finish PRO in Black Satin for the background. Rimmel Lasting Finish PRO is my favorite drugstore polish and am so sad it is being discontinued! I need to stock up before they are all gone. Anyway, for the white roses, I used a dotting tool to add my layers and I used Sally Hansen White On. I don't know if you can see it well, but I also painted some leaves in a grey/green, OPI Nein!Nein!Nein! OK Fine! but it kind of blends in with the background. This design really didn't take me too long at all. I want to recreate this in color soon, but for now I really like the simple black and white. What do you think?

Wednesday, October 30, 2013

Nail Art: Halloween Monster Nails

Happy Halloween Readers!! I never was a huge fan of Halloween ever since my mom made me dress up as a fat clown to keep me warm (practical mothers...gotta love them). I of course loved the candy as a kid, but nowadays I really like just relaxing with my husband and picking out scary movies to watch. Maybe watching a scary movie isn't actually relaxing, but it is entertaining! We've been watching American Horror Story on Netflix, which actually seems Halloween themed and scary anyway. I like scary movies, but I don't think I like scary nails.

Today, I have some monster cartoon nails to share with you. Before I saw this next design, I said I was never a fan of characters or cartoon type designs on nails. I am now proven wrong! I saw this Halloween nail tutorial originally on Ipsy, but linked to YouTube. The tutorial is done by I Have A Cupcake and I think it is adorable! I really don't like the look of zombie or bloody nails, but I think this is a cute way to celebrate Halloween without getting too literal on your nails. I just followed the tutorial with some adjustments based on what colors I had in my collection, but I think it turned out pretty similar.


So there is a mummy with blood red crazy eyes, a witch, Dracula, Frankenstein and a ghost. What do you think? Scary? No? Didn't think so, but I like the simplicity of the design and the cute factor of the cartoons. I used mostly regular nail polish, but my black nail striper came in handy here. This is a really fun intro to character nail art. If you check out the video be sure to check out I Have A Cupcake's other designs, she has similar little characters for different occasions. Have a fun and safe Halloween!

Related Posts