Thursday, June 27, 2013

Tutorial: Chevron Ombre Nail Art


I have an exciting tutorial for you today! I really wanted to show you how to make this manicure because I love the way it looks. I recently did this manicure which I posted here: http://handtasticintentions.blogspot.com/2013/06/chevron-ombre-nail-art.html. It is so easy to do and it really doesn't take much time at all. I can't take credit for creating this look, as I found it online while browsing one day. Unfortunately, I can't remember who originally inspired me. If I can find it again, I will update this post. In the meantime, I wanted to teach you all how to do this simple yet trendy look. You don't need any special tools, which makes this really easy for a beginner. Here are the only supplies I used:


Nail polish, of course. From left to right: Seche Vite Top Coat, Essie "Rock the Boat", China Glaze "Turned Up Turquoise", OPI "Can't Find my Czechbook". I like to use complimentary colors, but you can use whatever you like.

Regular tape and scissors.


I like to tear off a couple pieces of tape and then cut the pieces in half so there are no zigzag lines from the dispenser. You want to use two sharp and straight edges.


1. Paint all your nails a color of your choice (in my case Rock the Boat). Let it dry completely and when it is dry, place a piece of tape on the base of your nail, like pictured.
2. Paint on the next color of your choice (in my case Can't Find My Czechbook). It doesn't matter how much nail polish you get on the tape. 
3. Carefully pull off the tape while the polish you just applied is still wet. 
4. After that layer dries completely, place a piece of tape further down the nail. Try to space it so that the layers are even. 
5. Apply the third color of your choice (in my case Turned up Turquoise).
6. Carefully pull the tape off while the polish is still wet, just as you did for the previous layer and you have completed the final layer! Just clean up your cuticles if needed and apply your favorite top coat. My favorite is Seche Vite, but you can use whatever you like!

Here is the finished look:


I really hope you liked this tutorial! If you are interested in more tutorials, please let me know in the comments. Thanks for reading!

Tuesday, June 25, 2013

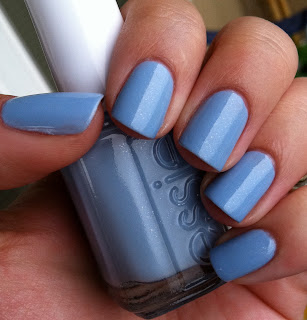
Swatch and Review of Essie: Rock the Boat

I don't know about you, but in Oregon we have a longstanding joke that summer doesn't start until the fourth of July. It seems to hold true this year as well. Even though summer has officially started, it is still raining. My solution: get some nail polish from the Essie Summer Collection. Makes sense, right? Today I have Rock the Boat from the 2013 Naughty Nautical Summer Collection! I have been eyeing this gorgeous blue for a little while now and even though I put myself on a no-buy restriction until the end of the month, I gave in (I had a coupon!). Check out the photos below:


Outdoors with cloudy skies


Another outdoor shot


Indoors


Indoors


Indoors


In these photos I used three layers of polish. I'll be honest, it wasn't the best formula. The first layer was a little goopy and tricky to work with, the second and third layers were a dream. Everything evened out and looked perfect. There was an issue with balding- meaning if my polish kept hitting the same spot it would rub away the previous layer. So, there were some application issues here, but definitely worth the trouble in the end. I don't know if you can tell, but there is a slight shimmer in this polish. It is a nice sparkle without being too obvious. The color dries slightly darker on the nail, and it turns out to be more of a periwinkle rather than a baby blue. Overall, it isn't the color I expected, it wasn't as easy to apply as I expected, but nevertheless I love it. It is a nice vibrant color for summer and hopefully will pull me out of my extended spring blues. Retails for $8, but it is widely available at places like Wal-Mart and Target as well as the usual beauty stores. Thanks for reading!!

<a href="http://www.bloglovin.com/blog/8293395/?claim=xsjymkhfz2h">Follow my blog with Bloglovin</a>

Sunday, June 23, 2013

Chevron Ombre Nail Art

Just wanted to share with you a quick update. If I have solid colored nails I usually will leave them alone for a few days but I can't go long without updating them and adding some nail art! What I have to share with you is an update of my "Dutch 'Ya Just Love OPI?" mani posted here: http://handtasticintentions.blogspot.com/2013/06/opi-dutch-ya-just-love-opi.html. I added an ombre effect with a chevron shape. Pretty simple to do, I used some regular tape to create the effect. I can add a tutorial if you all are interested. I certainly didn't create this technique, nor do I know who did, but I think it is a great simple design that any beginner can pull off.


All pictures were taken indoors with plenty of natural light. First layer as I said is OPI's Dutch 'Ya Just Love OPI?, second layer is OPI's Suzi and the 7 Dusseldorfs and the final layer is China Glaze's Harmony. This mani was just simple and rewarding. I think I finished it when my husband was making breakfast. My husband is pretty awesome! Like I said, let me know if you want me to post a tutorial! Thanks for reading!

Swatch and Review of OPI: Dutch 'Ya Just Love OPI?

Hello all! I hope you all are having a great weekend! I have been catching up on some much needed rest. Today I have OPI's "Dutch 'Ya Just Love OPI?", which is a medium purple with gold shimmers. It is from the Spring 2012 Holland Collection, which is actually pretty great I have a few from the collection, perhaps in another post I can review and swatch the others I have. I've never been to Holland, so I'm not sure if this collection really truly represents the country, but I love it nonetheless.


Outdoor view, quite shiny, but I hope you can still see the color!


Outdoors still, this one shows a little more of the true color.


Indoors, here you can see more of the true purple color but not much of the gold shimmer. 


Ah, here is that wonderful shimmer! It is so subtle that it kind of blends with the color on the nail, but it is present. I highly recommend this polish! I had no issues with application or formula. The polish went on smoothly and it was just the right thickness. All views were two coats of Dutch 'Ya Just Love OPI? and top coat. I usually use Seche Vite for my top coat. I think I got this on sale at BeyondTheRack.com, but it was an event purchase. OPI usually retails for $9 at places like Ulta. I can add a link to invite you to BeyondTheRack.com, if you are interested, comment below! As always, thanks for reading!

Tuesday, June 18, 2013

Swatch and Review of Orly: Fowl Play

Presenting: the multifaceted and misjudged Fowl Play. This is from the Birds of a Feather Fall 2011 Collection. It is a great dark purple with many types of sparkles and flakies! So gorgeous! I say that about a lot of polishes but this is one of those that you have to really look at up close to understand. That is why I called it misunderstood. From the bottle, it looks almost black, but once you apply it, it is a definite purple. The shimmers are so amazing, for real.

 
This is an indoor shot which kind of shows off the multi-colored goodness. 


Indoor shot with overhead lighting, which I think shows a little more of the purple color:


Indoor close up, love!


Outdoor shots which I hope convey how great this is! Really, if you are on the fence about this polish at all, just get it. You will thank me later. The formula was interesting. It was pretty sheer in the first layer and in the second it was totally opaque. These shots are all with two coats. I think Orly retails for $8 but you get .6 fl oz instead of the usual .5 fl oz or less. I bought mine at Ulta, but you can find it a lot of places like Sally's Beauty.

Sunday, June 16, 2013

Swatch and Review of Ruby Wing: Poppy


Hello everyone! Happy Father's Day to all the awesome dads out there!

I have an amazing polish to share with you! I was only recently introduced to the fabulous polish that is Ruby Wing. I think they are owned by Color Club, but I'm not 100% positive on that. Ruby Wing makes these transitions nail polishes, which are simply the coolest thing I have seen in nail polish for a while! I heard about it through my Birchbox subscription and was so excited to receive a sample! Except, I wasn't one of the privileged few to receive a sample. This story does have a happy ending, with my Birchbox points I was able to get it for free. Behold! This is Poppy:


This is indoors in the shade. Poppy turned out to be a lot more bright indoors than I expected, but still very pretty. The transition happens with sunlight not heat, I actually like that better. Here is Poppy in full sunlight:


 Amazing isn't it?? It changes so quickly too! I love the contrast from bright pink to deep maroon. It really does feel like I am wearing two different polishes. Here is a shot side by side:


 Here is a shot of my toes with Poppy indoors, it was a little difficult to capture the brilliance of it:


Here they look really dark, which I love. In direct sunlight:


I definitely need to get some more Ruby Wing, because this has me won me over! I think normally it retails for around $12 and on Birchbox $10, but they have limited colors. If you want to sign up for Birchbox you can follow this link: http://birch.ly/17elJL4. It is a $10/month beauty box. I have enjoyed it so far, particularly when they send me nail polish! Disclaimer: I get points if you sign up though my link.

Thanks for reading!

Saturday, June 15, 2013

Welcome to Handtastic!

Hello Blogiverse! I am really excited to launch my first ever blog! I feel like I am behind the times, it being 2013 and all, but better late than never, eh? I hope to share with you my musings on nail polish, old and new. Colors, swatches, comparisons, thoughts, reviews and all around loveliness that is nail polish. I'm going to just jump right in!
 
This is a quick nail art design I just came up with! It is China Glaze Snap My Dragon from the Avant Garden 2013 Spring Collection. It is amazing! I have a few polishes from this collection and they have a great subtlety to them. I honestly can't tell if Snap My Dragon is a red or a pink, but I love it nonetheless. It has a great shimmer to it that makes it look like it glows! This is two coats:


I was hoping to go back to somewhat traditional colors after using a lot of crazy colors as of late. So, I decided to go with a red/pink and the rest sort of followed. Over the two coats of Snap My Dragon, I stamped the fishnet design from Konad plate M57. After that I did a row of dots with a larger dotting tool and another row of dots with a smaller dotting tool. The black I used was Wet n Wild Black Creme and the pink was Sally Hanson Pink a Card. I bought my nail stamping supplies and dotting tools on Amazon for a great price. This is what the plate looks like:


 Anyway, I hope you like the design! Since this is my first post ever, go easy on me! I'm glad I finally got this blog started and I hope you like it. Thanks for reading!

Related Posts