Showing posts with label Red. Show all posts

Thursday, September 4, 2014

Nail Art: #31DC2014 Day 1 Red

I decided to participate in Chalkboard Nails' 31 day challenge, and I am already super late! So, I will be posting a series of challenge posts and hopefully catch up by tomorrow. For day one, the prompt was a color: Red. I love red nails, I know some aren't a fan of it, but I have always loved red nails. Red is a lucky color after all! I received this really unique and lovely color, Burning Embers from Northern Star Polish a while back for review (Summer Collection Review). I thought Burning Embers would make a great base for nail art for day one! I then added a stamped image from the Born Pretty Store Plate QA 88 which I also previously reviewed (Turquoise Stamping). Also, if you would like 10% off at the Born Pretty Store use code: HANDX31. I used Zoya Pepper for stamping and it worked surprisingly well.


Tuesday, August 26, 2014

Nail Art: Blended Tape Mani for Tri Polish Tuesday

Are you getting tired of Tri Polish Tuesday yet? This is the last one of this month, which means it is the last one with red, yellow and blue. I really loved these colors and was glad I got to use colors that blend so well to make so many more colors! I knew I wanted to create a blended sponged on mani for this last one, so that is what I did! I started with a white base (Sinful Colors Snow Me White) and added a tape pattern. Then I sponged on Sinful Colors Sail La Vie, Sally Hansen Mellow Yellow, and Butter London Come to Bed Red.


Monday, August 4, 2014

Swatch and Review of NYC Samba Collection

Today I have some simple swatches for your viewing and reading pleasure! I have two polishes from the NYC Samba Collection. I have a purple called Jacaranda Flower and a red called Carnival Red. My Rite Aid's display was pretty bare bones when I went, but I was able to pick up these two beauties and share them with you today!

Thursday, July 3, 2014

Nail Art: Fourth of July Designs

Patriotic nails galore! I have been seeing a ton of patriotic nails for the Fourth of July and I am going to add mine in as well. I did one yesterday that I loved, but wasn't overtly patriotic. These today are meant for Independence Day. I used the same red, white and blue for all of these designs. I used Ruffian: Ruffian Red for the red which is exclusively sold at Birchbox. I actually have the classic colors set (along with some others), but it doesn't appear to be available at the moment. For the blue, I used Sinful Colors Into the Blue, which is amazing! It really is a perfect navy blue. It has a weird scent, but the coverage and gorgeous color help me get over the scent. For the white, I have actually been liking my China Glaze White On White. I know in the past I have said I don't like it, but something about it has changed my mind. It is a little thinner than other whites I have, maybe in the warm weather, it has thickened slightly and now I love it. I love how I have a range of drugstore to high end brands here! 

Patriotic-Nail-Collage

Saturday, June 14, 2014

Swatch and Review of Northern Star Summer Collection and Cuticle Oil

Press Sample

Introducing (part of) the Summer Collection from Northern Star polish! Kristin sent me four of her very soon to be released Summer Collection along with one of her scented cuticle oils. I received Appletini! I have to say the first thing I noticed was that she packaged all of these products really well, each polish came in its own box, was well wrapped in bubble wrap and tissue paper, if you order, you will see. 


Wednesday, May 14, 2014

Nail Art: Dice Inspired Tape Mani

Today's design is inspired by a picture, which was a prompt for a nail challenge given to me by a fellow NW polish addict! We have a group on Facebook and we decided to do a round robin type challenge. I have to admit, I was a little stumped when I first got my prompt for this nail challenge. The longer I thought about it, the more excited I became! Below is my prompt.


I was inspired by the dice with many edges and the speckled colors on the dice. I started my design based on that. It didn't turn out exactly as I imagined, but I really love it! I used a base of L'Oreal Tea and Crumpets, then I laid down my striping tape and sponged on Color Club Mamba, Almost Famous and Evolution. The three combined to make purples and greens, which I think turned out really interesting!


Thursday, May 1, 2014

Swatch and Review of Avon Cherry Jubilee and Untamed

Press Sample

Today I have two polishes that were generously provided to me in return for my honest review. Jodi Stevens, an Avon Representative wanted to make sure the products she is selling are up to her high standards and offered some for nail bloggers to review. I was provided Cherry Jubilee, a deep and true red with a darker undertone and Untamed, a taupe brown/grey. Let's start off with Cherry Jubilee:


Wednesday, April 30, 2014

Swatch and Review of Orly: Faint of Heart, Monroe's Red and Space Cadet

Today I have three Orly polishes to share with you! Faint of Heart, Monroe's Red and Space Cadet are three great colors that have been sitting in my untried pile for far too long. I have been working hard to get through my untrieds, and every time I am ashamed at how long it took me to try some of these lovely polishes! 


Tuesday, February 18, 2014

Swatch and Review of Nails Inc.: Kensington High Street

This is my FIRST Nails Inc. polish! I have heard great things about the brand, but it is on the pricier side and we all know I don't need to spend more money on nail polish. However, I was at Sephora this weekend and they had this beauty on sale for $5! This is called Kensington High Street. I had a hard time finding other swatches online that weren't from the Gel Effect line, so I am not sure if this is limited or not, but if you like it, check out your local Sephora ASAP! Kensington High Street is a basic burgundy wine color, but one of those colors everyone loves. 


Friday, February 7, 2014

Nail Art: Olympic Nails

As I type this I am watching the Opening Ceremonies of the 2014 Winter Olympics! I created a design inspired by a tutorial from Chalkboard Nails. Her tutorial is for distressed nails and my thought was to incorporate all of the colors of the Olympic rings. It turned out a little muttled, and I think I used too many colors. I think it looks really interesting and different though.


Sunday, February 2, 2014

Nail Art: Chinese New Year Nails

Happy Chinese New Year!! Chines New Year was January 31st and yesterday I celebrated with family. This year is the year of the wooden horse. I decided to do some red nails with gold glitter to celebrate the occasion! I used butter LONDON Come to Bed Red and three different glitters: Julep Paris, Sinful Colors All About You and the best Chinese New Year glitter: China Glaze Electrify! I created a glitter gradient from the bast of the nail and went a little overboard!


Friday, December 6, 2013

Nail Art: Snowflakes!

Hello all! You know what is funny? Today was the first day of snow where I live and I am posting about snowflake nails! Wednesday I hosted a nail polish party and we all decided to do winter and Christmas themes. I had been wanting to try out snowflake nails for a while, and here is the result.


I used OPI Quarter of a Cent-Cherry for the red base and a nail stripping brush for the snowflakes. Snowflakes are a little harder than I thought they would be. I think I just forgot what a snowflake looked like. I like the way they ended up though. It was a little tricky with the striping brush, but really fun! I think I will be doing some more snowflakes this season! What do you think? What sort of Christmas or Winter nails are you going to create? Thanks for reading!

Tuesday, November 26, 2013

Swatch and Review of butter LONDON: La Moss

Today I have butter LONDON's La Moss for your viewing pleasure! This beauty came in my Ipsy bag a couple of months ago. It is a half size sample, but the brush and quality are perfect. La Moss is what I would call an oxblood color, which translates to a brown tinted dark vampy red. This is a jelly, which means I had to apply several layers for it to be opaque. Below I actually applied 4 layer, but I went a little crazy, 3 is just fine.


These pictures were without top coat! It applies so evenly and dries so glossy, I almost don't want to add a top coat! I love this polish. I found absolutely no faults in it. I love the way it applies, I love the color, I love the fact that it is a jelly, I love the quality. For real, I love it. One of the best nail polishes I have gotten in my beauty subscription bags ever. The many layers weren't a problem for me, but if you are only a fan of one coaters, this one isn't for you. I will say though, the polish dries really quickly. Highly recommended and if you are lacking an oxblood in your polish collection, I would go for La Moss.

Monday, November 18, 2013

Nail art: Black and Red Chevron Tips

If you read my last post about the Maybelline Color Show Brocades Collection, you know that I wasn't a fan of Embellished Blue. I did, however, decide to try out another shade:Crushed Crimson. This time, I wasn't disappointed. The polish is still really thick because of the dense glitter, but it was easier to work with. I really like how there is a mixture of shapes of glitter in this polish, especially the random larger hex glitter.


I used two careful layers of Crushed Crimson and then free hand painted chevron tips in two layers of Rimmel Lasting Finish PRO in Black Satin. Really simple. I did this while cooking dinner, which is something I don't recommend, but was doable. I really liked that Crushed Crimson was less textured than Embellished Blue. It is a great Christmas color, and I will definitely be using this again closer to the holidays! Hope you like it!

Tuesday, October 15, 2013

Nail Art: A Random Sampling


 Hello all! I have a somewhat unusual post for you today. I have a few nail art designs I never shared with you on my blog, but I didn't think these deserved a post on their own, so I decided to lump three nail art designs into one post! If you haven't figured it out yet, I like to play with nail designs a lot. Often I feel like the design doesn't live up to my expectations so I'll leave it on for maybe a day an take if off. The next few designs were of that variety of nail art. The first was for #nailartsep on Instagram (@HandtasticIntentions) and the theme was football. My husband is a Niners fan and I automatically thought I could represent his team on my nails for a little while at least. I'm not a huge fan of football, but why not make my husband happy and do a little nail art in the process?


The next design was one of which I wished I had taken more pictures! I wanted to try a natural colored leopard print nail and I actually think it turned out pretty well. I used some simple dotting tools to achieve this look. Nude: Ruffian, Naked, Brown: OPI, Wooden Shoe Like to Know, Black: Ruffian, Ciré Noir, Top Coat: NYC, Matte Top Coat. Ruffian nail lacquer can be found at Birchbox which is exclusive to the site. I bought the classics set which came with a nude, black and red. Once I finished my design, I felt like I had to have a matte finish, and I really enjoyed the final look. Makes me wish I had a better matte top coat!


This last design is one I had originally planned on writing it's own post about, but I didn't really like this one as much as I thought I would. It was inspired by one of Miss Jen Fabulous' designs seen on her YouTube channel. Pretty easy to do if you have dotting tools and an interesting look. I might try this again with different and more contrasting colors. I used A England Tristam for the dark blue and OPI Thanks a Windmillion for the lighter blue.


This was a pretty random assortment of designs, but I hope you like them! Let me know if you want a tutorial on any of these!

Wednesday, October 2, 2013

Nail art: Orange Leopard and Chevron Nails

Hello all! I've been thinking about animal print and particularly leopard print a lot lately. I don't usually wear animal print, but I like it. Sometimes I think it is a bit too wild, but I like mixing it with solids. That's kind of what I did here. I decided to create an unnatural leopard print coloring of orange and red and added a deeper red overlay to kind of balance out the print. I did this for #nailartsep on instagram.


I used only the above polishes in this mani from left to right: Soul Mate, Cherry Bomb, Mind's Eye (All Orly). I started with a base of Cherry Bomb and added irregular spots of Soul Mate. Then I added somewhat irregular C shaped around the spots and added some random dots using Mind's Eye. After I let it all dry, I cut up some tape into smaller angled triangles and painted Mind's Eye over that to create the sharpened chevron tip. This manicure made me want to perfect my leopard print painting skills, so look out for a more natural leopard spot on the blog soon! Thanks for reading!

Wednesday, September 11, 2013

Nail Art: Red and Gold Half Moon Nails

Nail art challenges can be tough. That's probably why they call them challenges. It is funny how once you are told to create something with a specific theme, you suddenly can't think of anything to create. This is what what happened to me with day 7-"school" nails. All along, I had planned to do my school colors from college: cardinal and gold. When I sat down to paint my nails, I simply couldn't think of what to do! I ended up trying a different style on each nail, which resulted in completely starting over. In the end, I must shamefully admit that I couldn't think of anything and just copied another blogger I love. The Nailasaurus, interestingly enough, did her nails for a challenge as well.


I thought these to be a bit too Christmas themed, but they would be great for the holiday season. I really love the red, such a classic shade. The red I used was OPI: I'm Not Really a Waitress, the gold was Maybelline Color Show: Bold Gold and as a base, I just used Nail Envy. I did a regular half moon mani but added a gold stripe with a small brush. I'm not that great with my nail art brushes, but I'm trying! Hope you like it, and definitely check out the original design by The Nailasaurus!

Wednesday, July 3, 2013

Nail Art: Patriotic Nail Designs!

Tomorrow is the Fourth of July!! Independence day kinda snuck up on me there. I love how festive things are for the fourth. BBQs, camping, fireworks and parades are just a few things that always remind me of the fourth of July. For the occasion, I thought I would share some red, white and blue inspired nail art!

Water Marble

Glitter Gradient and Doticure

Simple Flag Design


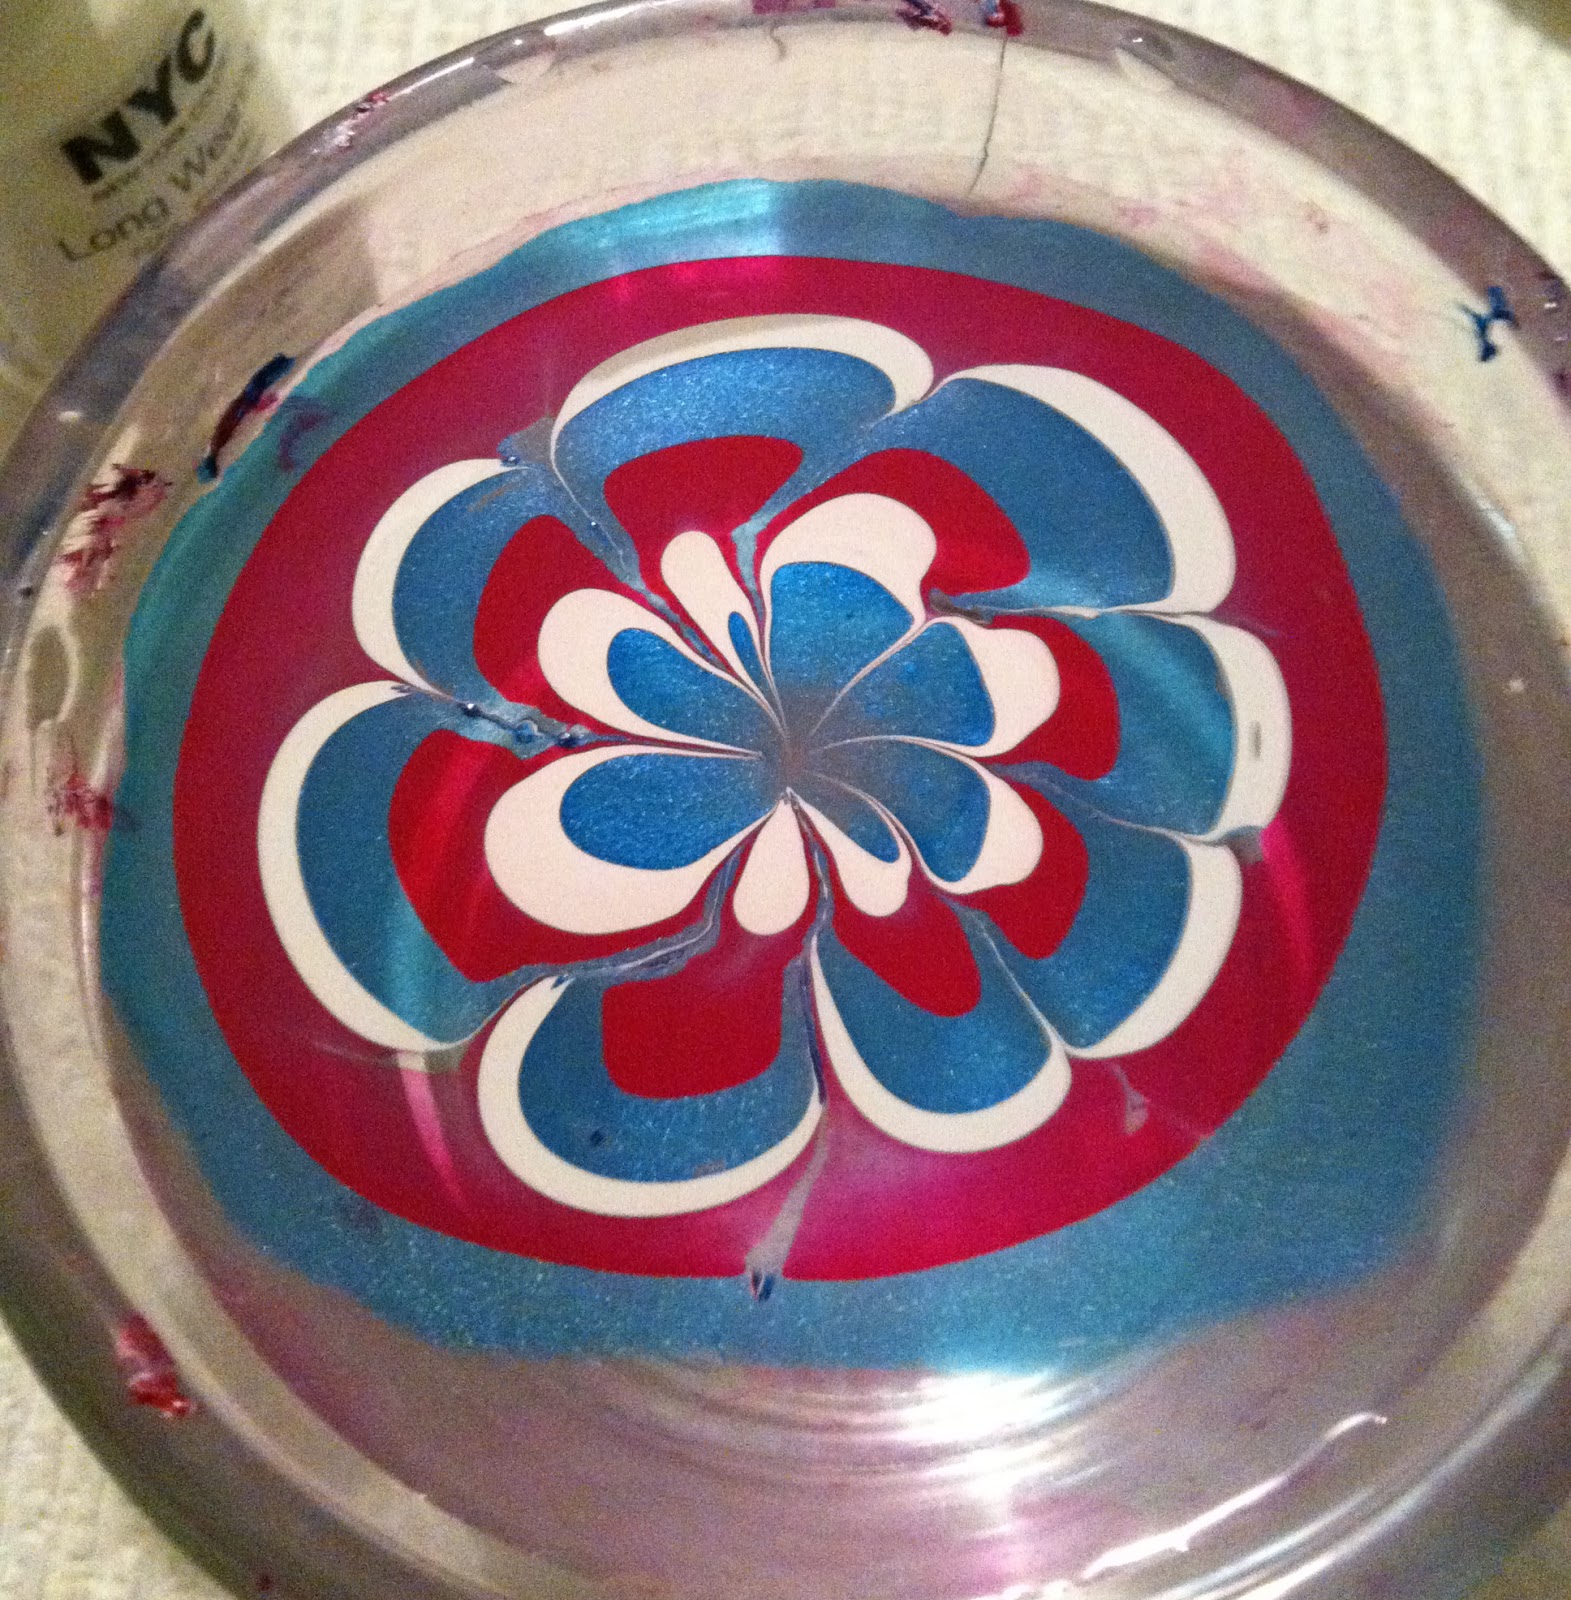
First up is the water marble design. Water marbling is hard work! I haven't mastered the art yet, but I'm trying. You can find lots of tutorials on YouTube, but it really takes practice. I find that you really have to find thin polishes that separate immediately, if not, it won't work. I use regular tap water, but I try to use colder water. After I water marbled my nails, I just added some contrasting dots. I really love the dotted effect. 


This is what the water marble looks like before you dip your finger.


Next up is a crazy design that uses a couple different techniques and looks great! I painted my nails blue with white accent nails. On the blue ones I added a glitter gradient just using the brush, no special tools. After that, I just added a ton of dots on the white nails.


Last but not least, I have a very simple American Flag design. This was inspired by Miss Jen Fabulous on YouTube: http://www.youtube.com/watch?v=EaTEKSqPBpk. As you can see, she definitely inspires me!! I just used regular tape to make the stripes, freehand painted the blue and used a dotting tool for the "stars".


These are the colors used for all designs. From left to right: Essie "Head Mistress", NYC "French White Tip" (really clever name...), Pure Ice "Celestial". The red photographed a little strange in some of these photos, but I really love the tone of this red. 


This was really fun for me. I love themed nail art! Well, I love all nail art, but I especially love themed nail art and I love America! I hope you all get to try some patriotic nail art. It is a very small way to show pride in the USA. Thanks for reading!!

Related Posts